.svg)
.svg)


When you build CI/CD with Jenkins, you often configure agent servers for builds to connect with Master and perform build deployments on specific servers. This adds up to a lot of servers to manage.
With the Jenkins Kubernetes plugin, you can have the plugin create an agent as a Pod in your Kubernetes cluster and have it run jobs on containers in the Pod. And when the job is done, it disappears, meaning you do not have to maintain it.
Setting up your cluster to do build deployments has the following advantages
- Reduce your management to a single cluster.
- Resource-efficient CI/CD by using the resource limitation (isolation) of containers.
- You can use container images to build and deploy in a consistent environment.
Let's set it up ourselves.
Install the Kubernetes Plugin for Jenkins
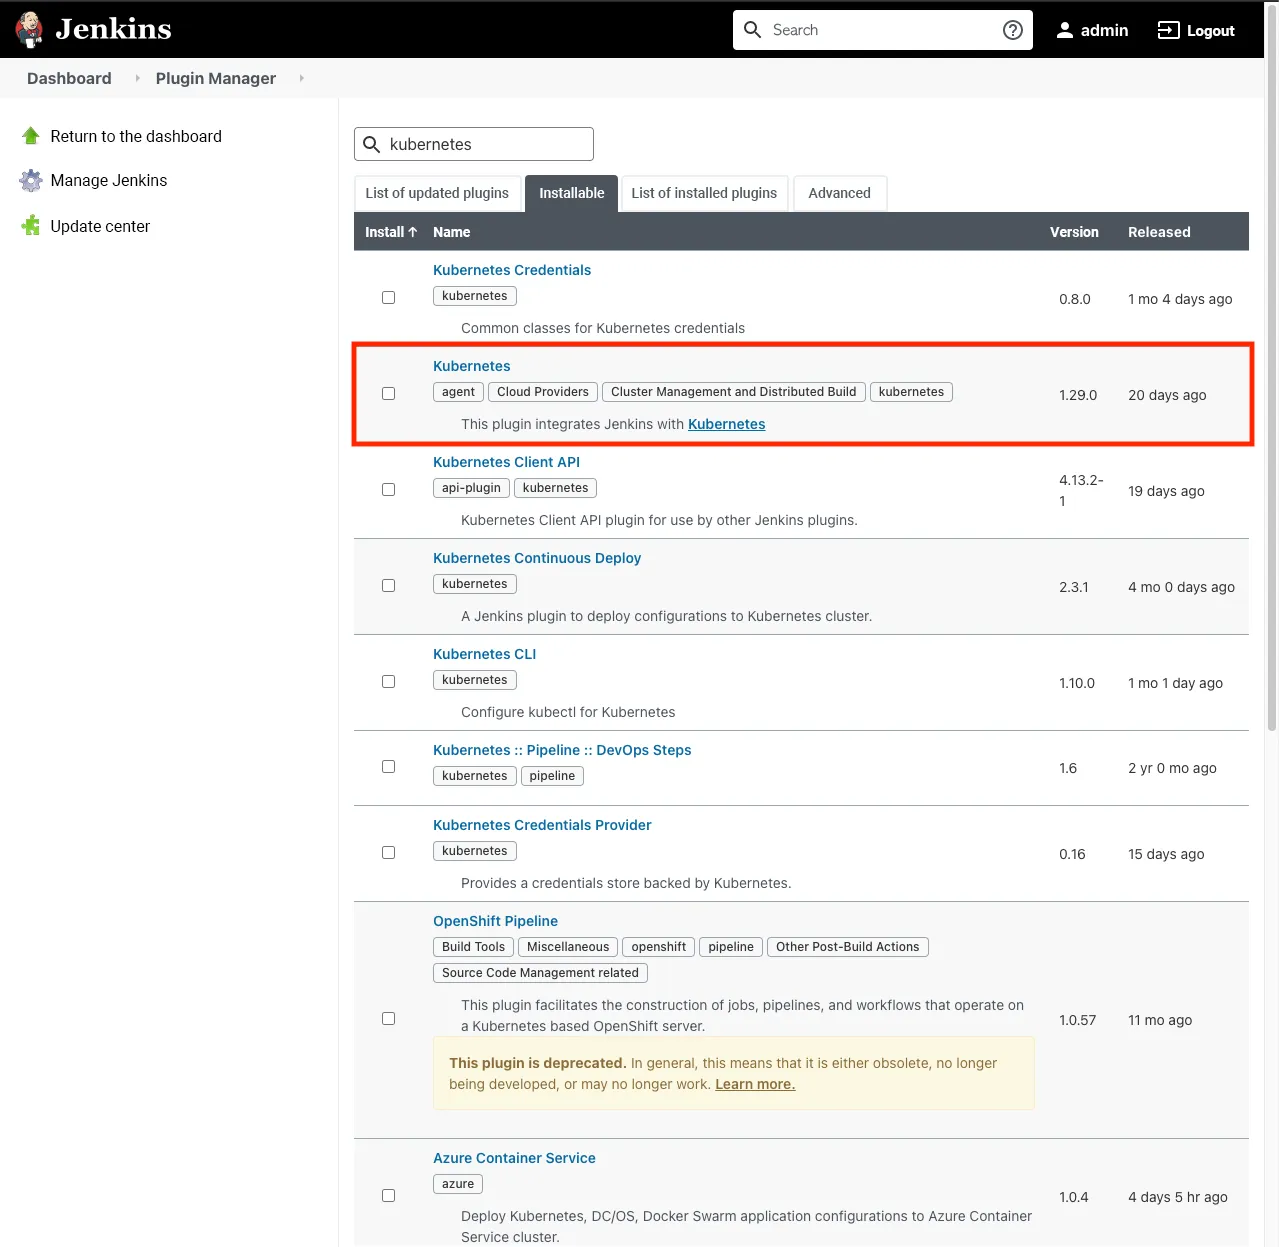
For testing, we created a new Jenkins server as a Pod in our cluster. In Jenkins' Plugin Manager, we search for Kubernetes, and there is a plugin called Kubernetes, which we install.
Setting up Kubernetes cluster information for Jenkins
Now we need to set the Kubernetes cluster information for jenkins to create pods, the settings screen is located in Jenkins Administration - System Settings - Cloud. In newer versions of jenkins, this has been split into a separate page, so click the text to go to the settings page. Click Add New Cloud to select Kubernetes and click Kubernetes Cloud details... to set the cluster information.
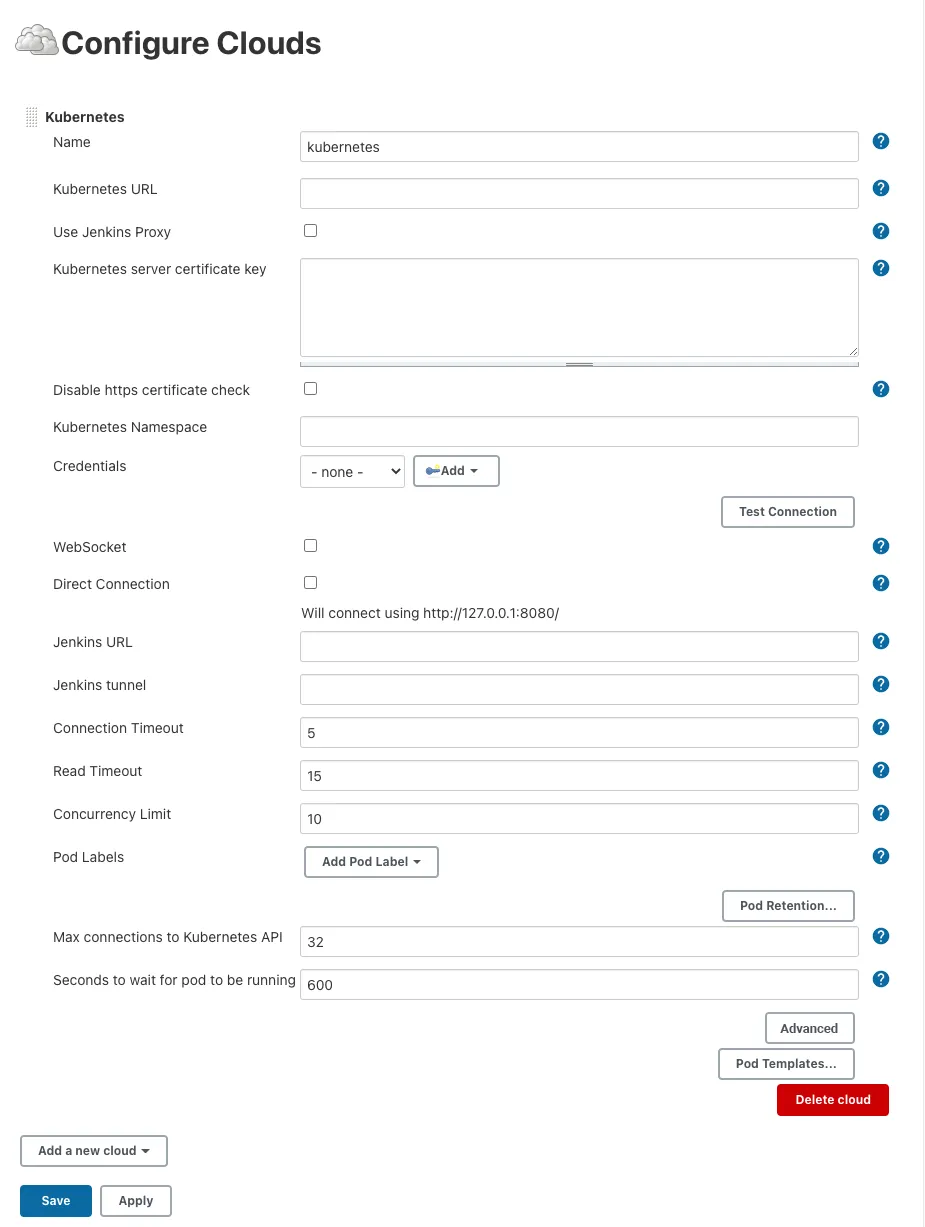
You should see the same configuration fields as above, but your environment will require different settings. In this example, we will upload the kubeconfig file of the cluster we are connecting to as a secret file to the jenkins credential to enable communication with the Kubernetes API. (If your Jenkins Master is acting as a Pod within a cluster, you can also assign a ServiceAccount to it to enable communication with the Kubernetes API.)
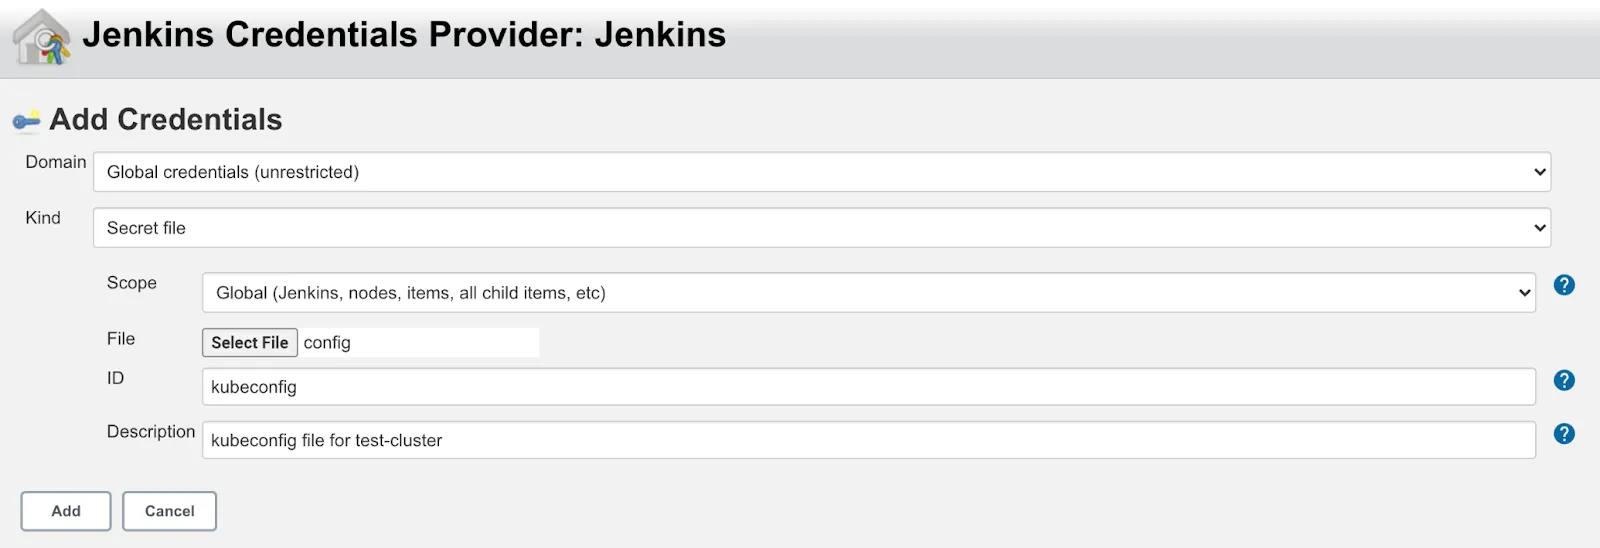
Register kubeconfig with Jenkins Credentials

If communication with the Kubernetes API is successful, you will see a Connected message.
Once you have verified that communication is working, you can create a test job that runs the sample Pipeline script to see if and how it works.
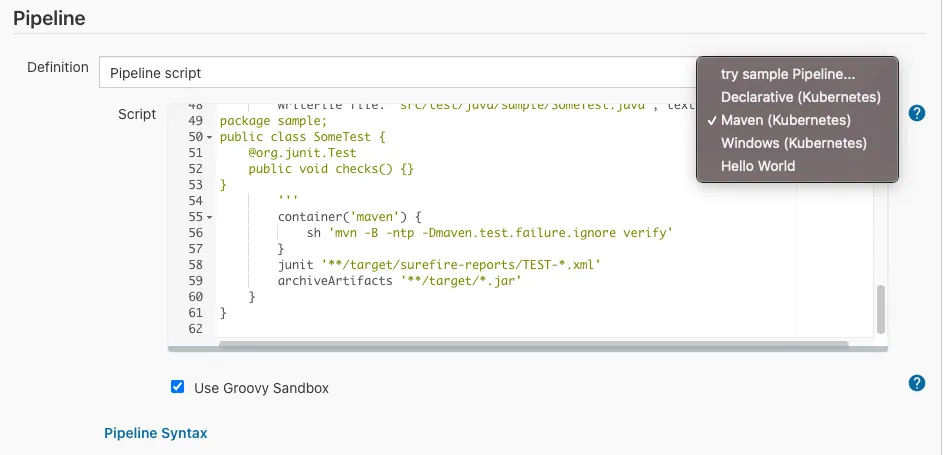
Sample Maven Build Pipeline script
When you start the build, a new Agent named after the newly created job will appear in the build list, and if you look at the Pods, you will see that a new Pod has been created in the specified namespace.
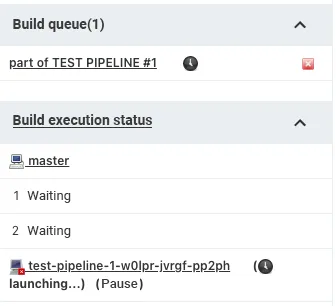

Created Jenkins Agent Pod
If we view the Pod with kubectl, we can see that there is one more working Pod besides the maven container we defined in the sample script. If we look at the Jenkins console output, we can see the contents of the Pod that will be built before performing the pipeline, and we can see that the jnlp container was automatically added to the PodTemplate we defined in the sample script. The jnlp container is responsible for running the jenkins agent and communicating with the jenkins master, which the plugin automatically added to the Pod.
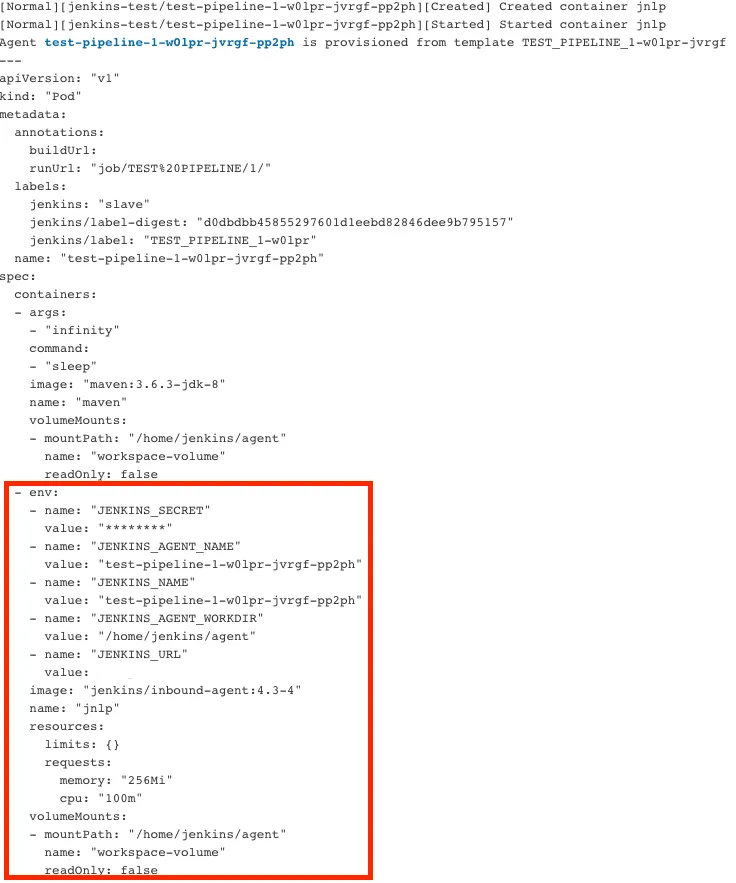
Container contents of a Pod performing a build
Now that we have seen the sample Pipeline script work and we have seen the overall execution process, let's create our own PodTemplate. There are two ways to create a PodTemplate to use as a Jenkins agent: a Global Pod Template and defining it directly in a Pipeline script. If you want to apply a Pod Template to a Job that is already in use, you can easily set it up by defining a Global Pod Template.
Defining as a Global Pod Template
If you look at the page where you set up Kubernetes in the Jenkins system settings, there is a button called Pod Template details... where you can easily define a Pod.
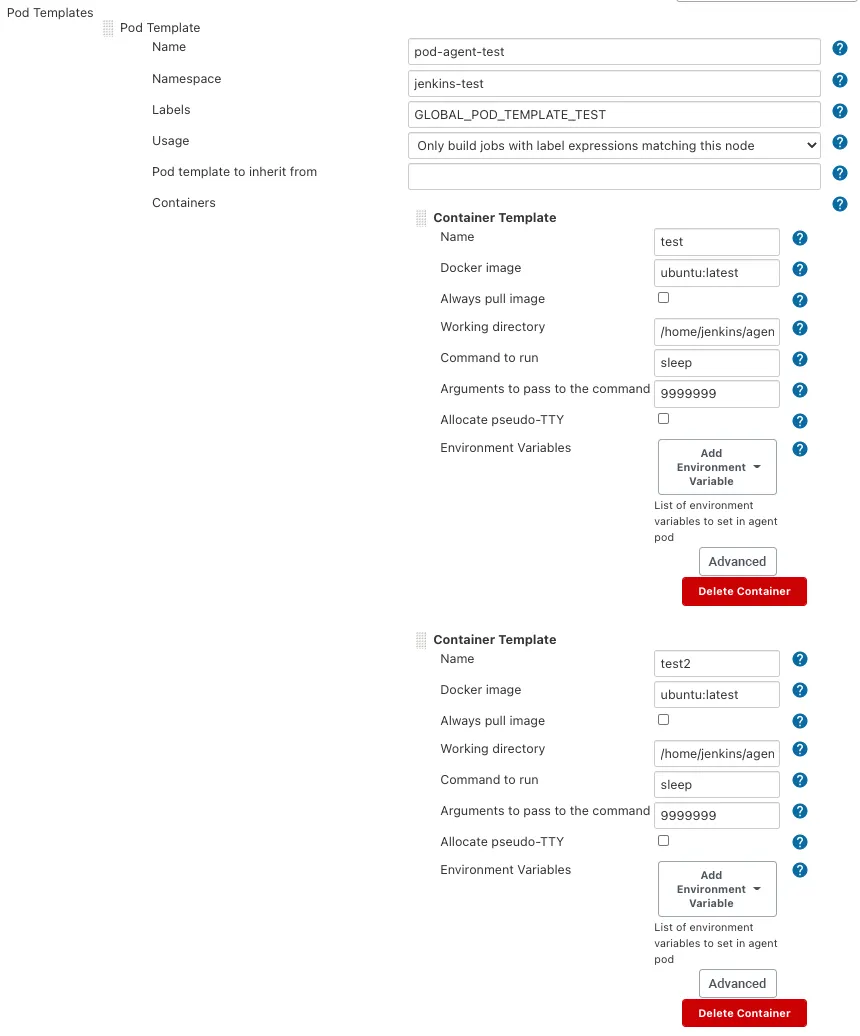
Global Pod Template
Fill in the required information for your Pod and specify the image to use. You can also set up multiple containers, but be aware that this will add a JNLP container, so make sure you do not override it if possible.
There are also a number of other settings you can enter in the Pod settings below.
If you want it to work on a specific Node, you can set most of the existing information required for a Kubernetes Pod, such as nodeSelector, env, hostPath volume, and so on. In particular, Labels are used to specify the node to write to in pipeline scripts, so make sure to give them unique names. In the example above, we have one Pod with containers named test and test2 using ubuntu images.
By defining a global Pod template once, we can inherit it from future scripts and merge or overwrite it. Let's test this by creating a declarative pipeline that runs a simple script using the Pods we defined earlier.
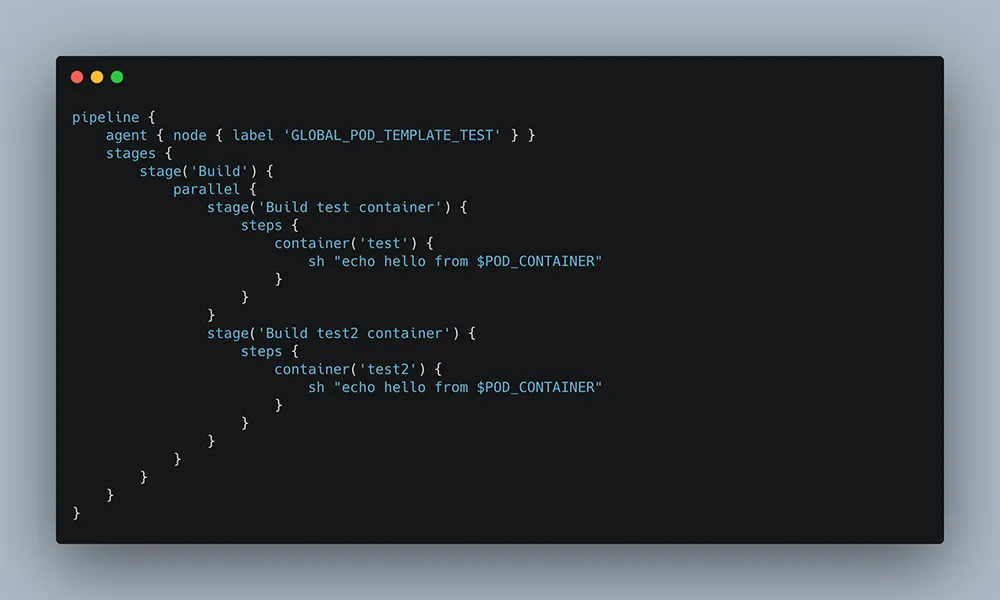
This is a simple example of creating an Agent in a Build stage to execute a simple shell script in the stage in parallel in a specified container. We have specified the template to perform with labels, the containers to perform in the stage's steps, and it exits after performing echo in each container.
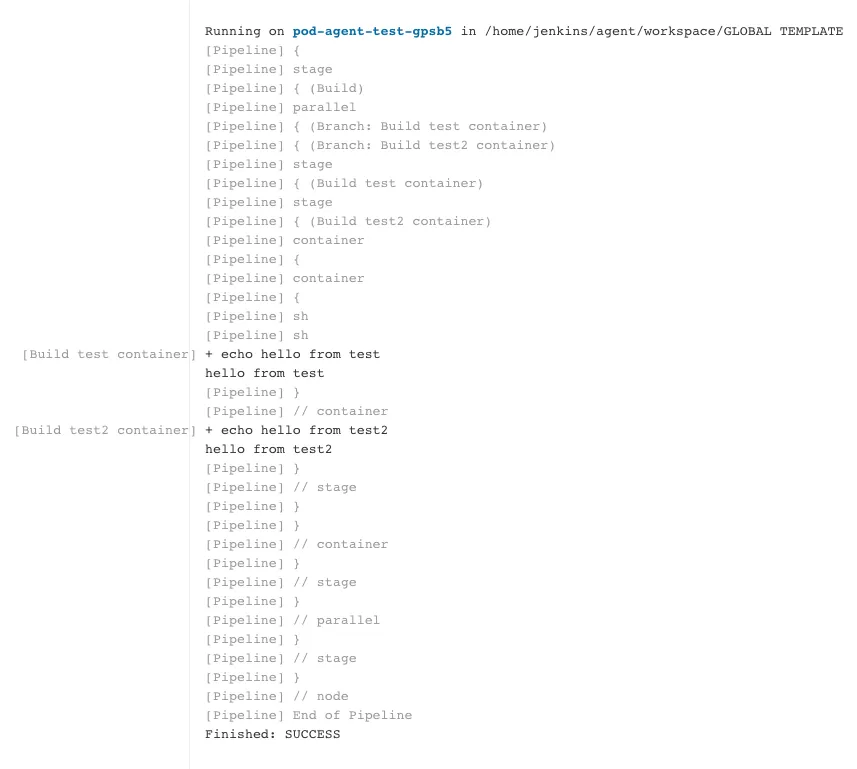
Run the script in each container

The result of running in parallel
With this simple setup, you can easily plug the Global Pod Template into your existing pipeline script. If you need to, you can even create multiple Agents (rather than multiple containers) in a single Pod and configure them to work in parallel.
Defining a Pod Template in a script
To define a Pod Template directly in a Pipeline script, you can either write the Pod yaml content yourself or use the settings provided by the plugin. You can find the settings provided by the plugin at the link. Let's write the podTemplate directly into the pipeline script with these settings.
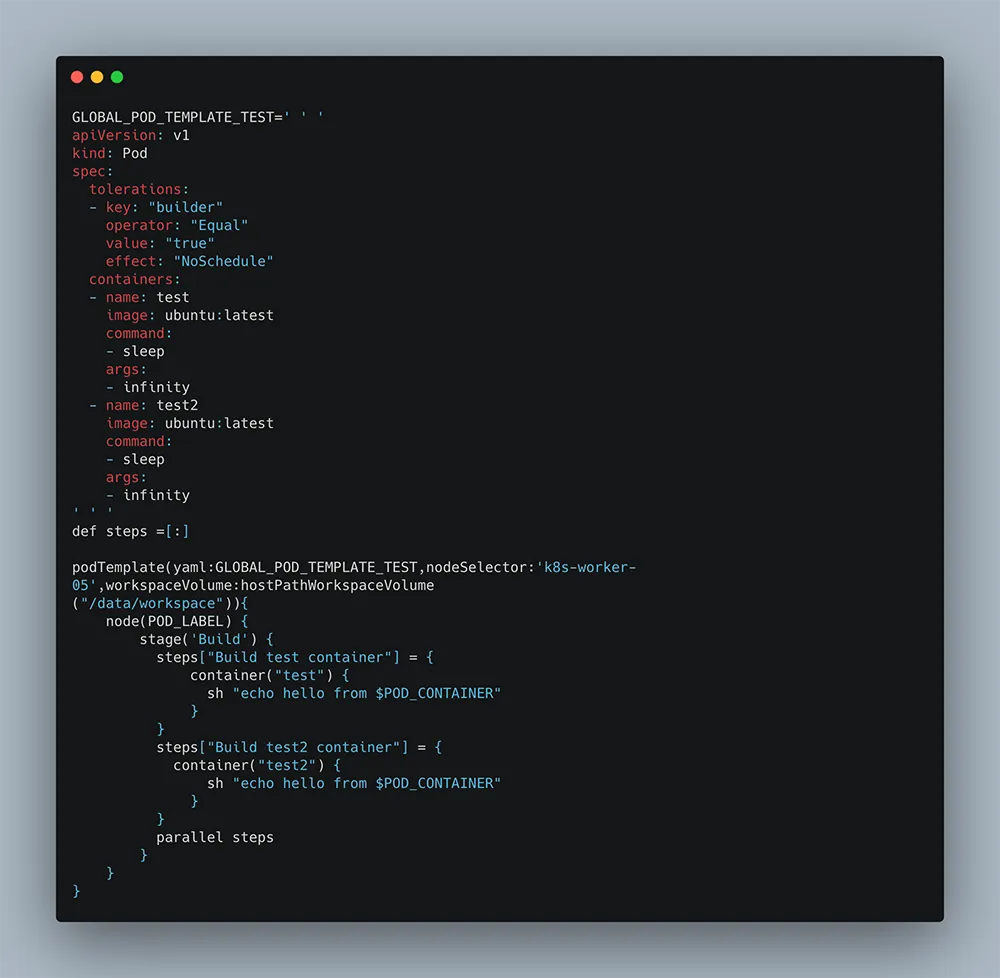
This is a pipeline script that takes what was defined as a Global Pod Template and writes it as a pipeline script. The Pod is defined through the podTemplate setting in the plugin, and the pipeline script content is added afterward.
First, we define the Pod yaml content as a string in a variable, and then specify the yaml variable in the podTemplate, which is a setting provided by the plugin. You do not need to define the yaml, you can just use the podTemplate settings, and if there is nothing in the plugin settings that you need, you can define it in the yaml.
If you do not need something in the podTemplate settings, you can define it in yaml and then override the yaml and settings.
For example, in the example above, we have tolerations in the Pod yaml, but the podTemplate settings do not support setting tolerations, so we added tolerations to the yaml and nodeSelector to the script settings.
So what we defined in the yaml will override what is set in the podTemplate. So now that we have given tolerations to access nodes with a certain taint with the yaml, the nodeSelector that we defined in the plugin settings will allow us to assign to those nodes and only create pods on those nodes. You can set this up to suit your environment or your needs.

When executed, it will behave the same as the Global method we set up earlier.
Final thoughts
Building container images from containers in parallel using DIND
With the Kubernetes plugin for jenkins, you can easily get the advantages mentioned earlier and try to reduce build time by creating agents per application to perform jobs in parallel.
Using dynamic agents and kaniko or dind (docker in docker), you can have each agent perform docker image builds in parallel.
In the case of Docker, without using docker-compose, image builds on one Docker engine cannot be done at the same time, so they are done sequentially, but you can configure each agent to do it in parallel using dind or kaniko container images without using docker-compose.
Best of all, we do not need to add a separate server or cloud service just for building docker images.
Next time, we will talk more about dind (Docker in Docker) or kaniko, both of which allow you to build Docker from Docker.
Reference link: https://github.com/jenkinsci/kubernetes-plugin/


